Basic Needlepoint Stitches
What Are The Basic Needlepoint Stitches?
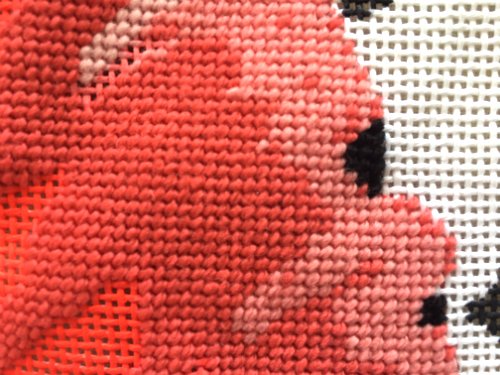
Let's learn how to do the basic needlepoint stitches. All you really need to know is one stitch. All basic needlepoint stitches look like this on the front of the canvas.
There are three ways of doing what is essentially this one basic needlepoint stitch, and they only look different on the back of the canvas.
We'll show you how to do all three because you might interchange them a bit when you're working a project.
Basic Needlepoint Stitches - How To
First, some general advice on basic needlepoint stitches:- We recommend you start by stitching the smallest areas of color first - the most detailed areas. Or if there is a white or very pale colored area next to a dark color, stitch the lightest color first - this is so fibers from the dark thread don't "bleed" into the pale color.
- When you get to larger areas of color, you'll get the best results if you use basketweave stitch (instructions basketweave stitches are below). Start this stitch in the top right corner of the colored area.
- When you have patches of the same color close to each other e.g. within a half inch, you can carry the thread across to the adjacent area. If the color areas are farther than about one half inch apart, you'll need to snip the yarn off (having secured it behind some stitches as discussed below) and start again in the new color area.
- If the edges of your canvas aren't taped, we recommend you tape your needlepoint canvas to prevent it from fraying and the threads from catching.
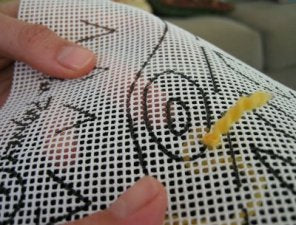
Regardless of the needlepoint stitch you are using, start off by securing the thread onto the canvas. Now, a needlepoint purist would tell you never to tie a knot. Thankfully, we are not needlepoint purists and that is why you love us. Knot away we say. Here's how:
- Cut off a length of thread, around 18 inches is good.
- Thread your needle (wetting the end of the yarn always helps the threads stick together so you can achieve this task).
- Make a knot at the end of the yarn.
- Starting on the "right" side of the canvas, a few holes along from where you will place your first stitch, take the needle down to the "wrong" side. The knot will be visible on the "right" side of the canvas as in the photo above. When you start stitching you will work toward this knot and your stitches will cover the thread behind and hold it in place so it doesn't pull out. When you reach the knot just snip it off.
Basic Needlepoint Stitches - Securing The Thread End
When you need to change color, or move to a different area of the canvas, or you have used up the yarn and need to re-thread the needle, you'll need to snip off the thread you've been using. However, you can't just leave it dangling or the stitches will loosen. When you have stitched the last stitch, with the needle on the "wrong" side of the canvas, slide it through the back of 3-4 nearby stitches. This will take the thread behind these stitches and it will be secure. Cut the thread close to where the needle emerges so the canvas looks neat.Click through for more instructions and tips for starting and ending a needlepoint thread.
When reading all the stitch guide graphics that follow, you bring the needle up to the good side of the canvas on the odd numbers, and push the needle down to the wrong side of the canvas on all the even numbers.
Basic Needlepoint Stitches - Half Cross Stitch
Half Cross is not the world's greatest stitch because it doesn't cover the canvas particularly well, but it's easy to learn and good for areas where you are only doing a few stitches of one color. That's why we include it in this tutorial of basic needlepoint stitches.

Start at the top left of your canvas or block of color. Work from left to right in a row across the canvas and then return along the row beneath. Many people find it easiest to work the return row by turning the canvas upside down and then following the same diagram above. If you don't turn the canvas then stitch No. 11 would be directly below number 10 and No. 12 would be directly below No. 9; No. 13 would then come up in the hole already occupied by No. 9; and so on.
The defining factor of the Half Cross stitch is that it has a vertical stitch on the "wrong" side of the canvas (not shown).
Basic Needlepoint Stitches - Continental Stitch
Continental stitch covers the canvas well but also tends to distort it. But, it's great for working smaller areas and we use it a lot.

To return back down the row underneath you can turn the canvas upside down and follow the diagram above. Or, if you don't turn the canvas No. 9 would come up in the hole already occupied by No. 5 and No. 10 would go down in the hole beneath No. 7; then No 11 would come up in the hole occupied by No. 3 and No. 12 would go down in the hole below No. 5; and so on.
On the "wrong" side of the canvas you will see a long diagonal stitch.
For more detailed instruction on how, when and why to use needlepoint continental stitch click the link.
Basic Needlepoint Stitches - Basketweave Stitch

It's named for the basketweave pattern it forms on the "wrong" side of the canvas. Work this stitch diagonally, starting at the top right hand corner of the area.
Contact us with questions about basic needlepoint stitches.