How to make a small rectangular or square design into a rounded ornament
You love a particular canvas and think it would make a perfect ornament for your tree, but the designer didn't think of it. The design is 5 x 5,or better yet, 5 x 7. That’s an odd shape for an ornament. But don’t give up, you can easily make that canvas into an oval or circle so that the finisher can turn it into an ornament.
First rule – don’t stitch the entire canvas & ask the finisher to make it into a round shape. There’s simply too much stitched fabric at the corners to get the curves you need - it's just too bulky. And, if the finisher cuts the stitched canvas it may fray. You won’t be happy with a slowly unraveling ornament. You'll have to make some adjustments to the canvas before you stitch. It’s easy to do – you only need a pencil, paper and a sharp pair of scissors. A compass would help, but is not necessary.
The first step is deciding what shape & size you want the canvas. Look at the design. Be realistic. If it’s the cat in the center "Return of the Finch" by Catherine Nolin, a 14" x 11" design, that you want to turn into an ornament, maybe you should have the ornament custom painted instead. The part you want to make into the ornament should be a dominant feature of the canvas chosen. Stitch the beautiful piece and pick another for your ornament.
We’ve chosen 2 canvases – very different in style – to illustrate. The first is a JulieMar's "Goldfish" that is a 5 x 5 square. 
It is perfect for a round ornament. JulieMar actually thought of that and made this into a 3” round ornament. 
Too small for you, take your 5 x 5 and turn it into a 4 1/2” diameter round. Here’s how.

Start by determining what size you want your ornament. Measure the area you want to stitch. The fish measures slightly over 4", so I'm going to make my ornament 4 1/2" wide.
Now, take a piece of paper. If you have a compass, draw a 4 1/2” round circle in the center. If you don't have a compass, take a lamp, can, or anything that has a round bottom that's about 4 1/2" in diameter and trace the bottom onto the white paper. Now cut out the center. If the object you traced is smaller than 4 1/2", cut outside the line - if bigger, cut inside the line. 
Place the white piece of paper with the missing center over the canvas and decide where you want to position it. Once positioned where you want it, trace the outer rim of the circle VERY LIGHTLY in pencil. It's just there as a guide. Do not use ink or fabric marker as it may run in the finishing process. Now you will only stitch inside the outlined area, pretending the rest of the canvas isn’t painted. When you stitch the canvas you can go a row over the line, but don’t stitch too much because your ornament will be bulky at the edges. And, don't cut the canvas - you can't put it on stretcher bars if it's not rectangular or square in shape and you may decide later that you want it a tiny bit larger.
The fish was easy since it was just one central object. Lets pick a slightly harder canvas to turn into an ornament. 
“Letter to Santa” by Purple Palm is such a cute design – wouldn’t that red dress be gorgeous on your tree. But, it’s just too unruly as a 5 x 7. Let's make it into a round ornament – or an oval one. First decide on what you want to feature. Do you want the girl to be the center – not really care to see the mail box, or do you want as much of the image as you can get.
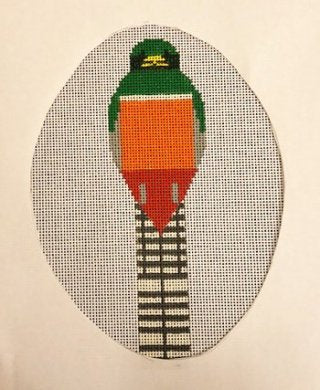
Then decide on the shape. That may be dictated by the design. For example, Orange Belly Trogon, HC-o328 by Charley Harper is best as an oval so that you get the bird without so much background.
Next, measure the area you want to include in the ornament. With "Letter to Santa" we want the ornament to be a 5.5” round or a 6" x 4 ¾" oval. 
You already know how to turn the canvas into a round ornament. Need a reminder, just scroll up to see the directions using the JulieMar Goldfish.
Turning the design into an oval shape is done in a similar manner. Take the same white paper & mark out the long side. Mark the center. 
At the center measure and mark the shorter length. In a curved line, connect the markings. Don’t make them too sharp or they won’t look like an oval. Again, cut out the center.
Finally, decide what portion of the design you want in your ornament, moving the paper around until you're content. You will have more options with the oval shape. Determine your preferred focus . . .
 |
|
 |
If you want the girl to be the focus, the mailbox & snow on the ground aren't as important, place the opening as I have in the picture on the left. If you want the entire mail box and more of the snow, like the image on the right, move the oval opening down and to the left - even if it's a bit over the original design size. When stitching, remember to ignore the red line at the bottom, continuing the white snow. Using a pencil, draw the outline of the oval very lightly on your canvas. Remember, DO NOT use pen or fabric marker as they may run in the finishing process.
Happy Stitching!
Did you enjoy this article?
Share it on Pinterest or Facebook...or both....or any other social media platform you "enjoy".

But, most importantly, don't miss out on reading more information just like it. So, if you're not already tuned in...