Needlepoint Lettering
There are a few ways you can apply lettering to needlepoint canvas.

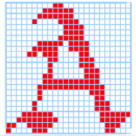
1. Count the letters onto the canvas from a charted alphabet
 There are many books with needlepoint alphabet charts as well as free charts online. Cross stitch alphabets can also be adapted to Tent stitch. When working from a chart you can scale the project up or down by doubling/halving/etc the number of stitches.
We suggest you select an alphabet from the chart and then transfer the letters you want to use to a piece of graph paper the same scale as the canvas e.g. 18 holes per inch/18 grid paper. You can print out most scales of graph paper from online sources. By graphing your lettering you can make sure the letters are the right size/scale for the project and that there is enough space available before you begin stitching. You can also find the center of the lettering and match it to the center of your canvas. When you start counting your stitches onto the canvas it is best to work from the center (of the lettering and of the canvas) outwards.
2. Paint the Letters On the Canvas
Instead of counting the stitches from the graph onto the canvas, paint them on. You can also do this by using computer fonts - figure out how big you want the lettering and then use Word, or any other font-containing program, to type the lettering. Print it out on paper (use the margin ruler in Word to determine how big the font is) and lay the paper under your canvas to check for size and centering before painting the letters onto the canvas.You can also sketch-outline the needlepoint letters onto the canvas using a grey or pale blue (colors that tend not to show through) waterproof marker designed for fabric e.g. FabricMate pens, Marvy Fabric Brush Markers. If you want thick letters then select a block letter font and outline it on the canvas. This can then be stitched in with a diagonal Satin stitch or a Tent stitch.
3. Use Surface Embroidery
 This is a great option if you want a free-flowing look. It also adds texture to the design, as the lettering is stitched or couched on last and you can use a different fiber for this if you wish. The image on the right shows how letters and shapes can be couched onto a canvas. You can stitch letters on as surface embroidery using a variety of stitches, but the most common are a back stitch or a whipped Back stitch.
 There is a tutorial about whipped Back stitch lettering here. These stitches give quite a thin lettering appearance.